Wednesday, February 10, 2010

Fettuccine Alfredo!
It is a widely acknowledged fact that I gauge the quality of my days by how many noodles I can manage to consume in them.


Here's the deal, pals. I have been gone for some time from this here food blog, and we're all going to pretend that it is because I have been traveling this little round ball we call earth and collecting recipes and making foodstuffs for every shining face I saw. If you think you've seen me in the last few months, you have not! Fraud! It's all been a hologram! A clever trick of light! Smoke and mirrors! I have been away, okay? Right? This is my only excuse. Now that you have accepted it and forgiven my hiatus, onward. Fettuccine Alfredo!

This is a good recipe. My un-vegan friend Dustin insists that it is the best Fettuccine Alfredo he has ever had, and my sources seem to suggest that Dustin has had his fair share of the dish. This bolsters my confidence in this recipe considerably, and means that when he asked for it specifically to be made for him before he moved to Florida, I obliged. Sort of like a last supper, y'know? That specific batch might have been a touch salty, however. Tears and what not. Friends moving. My life is hard.

This post also has a special perk: The introduction of WINE CATS! I thought better than to make yet again another sister blog (if you have not yet visited my informative book blog, hop to it!), but think it will just make infrequent visits to food cats when appropriate. Which it is today!

The recipe!:


1 lb whole wheat fettuccine pasta
1/2 cup vegan butter OR oil! (if you use oil, step up the salt a touch)
5 cloves garlic, pressed
1 head broccoli
1 onion
4 oz (give or take) mushrooms of your choice
4 cups mimiccreme
1/2 cup nutritional yeast
2 teaspoons salt
1 teaspoon dried basil
1 teaspoon dried oregano
1 tablespoon fresh parsley
some pinches of black pepper to taste

I had my trusty sidekick Cheryl with me for help, creative input, and general companionship during this process. To be honest, she is more of a life partner of sorts, and often the foodcats second and equal half, but I am sometimes forced to call her a sidekick for tax purposes. She is the greatest, and I will suggest again that if you don't have her, find someone who looks like her and hold them to unbearably high standards. Either that, or just call her up! Tell her you need help with your fettuccine alfredo or your jigsaw puzzle! She is not guaranteed to come to the rescue, but hey, you tried! 


This is also pretty much how we look all the time. If you see us in town, please alert us of any low awnings or potholes.

Boil water, throw the pasta in. 


I am choosing to not describe the process of making pasta in detail for several reasons. I want to give you an opportunity to humble yourself and ask a pal for help determining when it is done. I also want to give pals everywhere the opportunity to make up a silly illogical way to determine that. I want your dearest friend to lie to you and tell you that to check for done-ness, you put a single piece of pasta in a jar and leave it outside for 3 hours. If it is still there after the time period, then the pasta is and was done. Fair warning: If you call Cheryl, she will tell you just that. Don't let her pull a fast one on you. Also, she will not be able to contain her deadpan for long, so just wait it out.

So, make your pasta. This can be done, of course, while all the other steps are happening too. When it is done, strain it and return it to the pot. Throw some oil or butter in there to make sure it doesn't all stick together. Mix it around until you have reason to believe that it won't stick. Be proud that you have utilized your powers of reason, and that your pasta won't be in one big gob when you go to add the sauce!

Dice up your onion. 


Melt the butter in a saucepan, or put your oil in and get it all warmed up. Sautee the onion until it is translucent! 


Press the garlic cloves into it, mix it all around. You can also dice your garlic, of course, but I have found it hard to ever dice garlic when I have a stellar garlic press handy. 


Dice up your broccoli into whatever size you desire. We went sort of smallish. Larger steamed stalks of broccoli tossed on top of the dish afterwards is a swell idea, too!


After a few minutes with the onion and garlic in the pan, add the broccoli. Cut up your mushrooms! We used the cutest little mushrooms money can buy, brown beech tiny buddies (unofficial name), but you can really use any old kind. 


In the past I've been partial to crimini, but it's really your call. Don't forget to call Cheryl if you need advice.

Put your mushrooms in the saucepan with everything else. 

Now comes the Mimiccreme!

Mimiccreme is great. Really. I sing its praises quite often. I'm sure in a few years I will discover something truly awful about it, as goes for everything ever, but for now, I am holding fast. Mimiccreme rules! It is soy, gluten, and lactose free! It is essentially only water, almonds, and cashews! It is heaven sent! It is what will make this alfredo so freaking awesome. 


When buying Mimiccreme, make sure you get the unsweetened kind! For this recipe, at least. If you want to make ice cream, grab the sweetened stuff. You should be able to find it at your local health food store, but I have found it difficult to locate in some towns. Don't lose heart, ask a store to order it for you, or keep searching around! If things get bad, suggest I start up a Mimiccreme black market, charging a literal arm and a leg for each carton I ship out. What will I do with the limbs, though? What will I do with them? My life is hard.

Measure out your Mimiccreme and put it into the saucepan. Your vegetables will continue to cook in it! Add your nutritional yeast and all the other spices. 


Cheryl is partial to parsley, so she insists on putting it fresh into the recipe, and I can't blame her. 


It would be preferable to put fresh basil and oregano in, too. Oh, fresh basil. It may be clear that I am lamenting the winter months in this way. Life is better when you have fresh basil at arms length in the garden! This might not even need to be said.

Feel so free to adjust all the spices to taste! And add more of them in general! As I have said exhaustively before, I'm a total hack! Just do whatever you want to the recipe! It'll probably still be awesome! Yessss!


So, make your alfredo sauce, and then pour it into your done pasta! The sauce should be sort of thick from its time on the stovetop. Mix it all together. 


Note: gratuitous friendship bracelet view in that last shot! That's right! We have friendship bracelets! It's the 90's! 

Oh, and then plate your noodles! 


Garnish with more parsley, sprinkle more nutritional yeast and black pepper on it, do your worst! The future is yours!


Now for a brief word from wine cats! If you know Cheryl and I well enough, you will know that we are typically saving around 15-18 bottles of wine at any given time. On the few occasions friends have actually asked for this, I have had great fun going through them all and explaining why they need to be saved or what their sentimental value is or where they came from, etc. A large portion of the wine rack is wine from Adair Vineyards, which is the winery/vineyard that the both of us have worked at for about five years now. Marc Stopkie, the winemaker and owner and all around best guy and boss ever, makes the best wine. No exaggeration. I will fight any opposition with cool reason and some sips of his 2004 Frontenac, which is the specific subject of this meal.


2004 Frontenac! Aged in Minnesota oak barrels for three years. We've been harboring some bottles of this on the rack for awhile, and made the motion to drink one. The Frontenac grape is a French-American hybrid grape that was developed in Minnesota. Adair exclusively grows French-American hybrids because they were specifically developed to suit our more cold-hardy climate. And as you'll read below, being committed to using only local fruit, it makes sense to go with grapes who were developed to have a better yield in our growing area. Also, French-American hybrid grapes are so wonderful! The DeChaunac being my absolute favorite, since you were wondering.

Here's the story with Adair Vineyards. Super small business and operation in New Paltz. Marc does vineyard maintenance, makes all the wine, and runs the business. There are few employees (all dedicated, and luckily, us!), and Marc works super super hard. There are 11 acres of vineyard on the property, and any grapes that don't come from our vineyard come from another local vineyard, 4 miles from ours. Marc works pretty closely with them, too. 

a fall sunset on the vineyards

Any fruit that is used for dessert wines (peaches, blackberries, black currants, nectarines!) are also locally grown. Marc is committed to this! He does things as organically as possible, but is not organic-certified. This is something he could tell you a ton about, but what I can offer is this. Some certified-organic vineyard products are, while organic, totally carcinogenic, which he'd obviously prefer not to use. Some natural/non-organic products are safer than the organic counterparts, which means Marc would rather use them! Since the winery is small and all the wine is sold through the tasting room, at farmers markets around New York, and at one store locally, Marc doesn't have to add a ton of chemicals or anything that would be needed if he was shipping the wine great distances or if they needed to sit on store shelves for long periods of time. 

Dustin, Cheryl, and I at a winery holiday event

Also, good news: Adair wine is vegan! While you might not think about it, wine is something that can easily not be vegan. I know, I know, "But it's just grapes!" Alas, part of the filtering process that the wine goes through often involves gelatin, unfortunately. Marc uses a sea-weed based filter, instead. There are alternatives! You can tell if wine is vegan sometimes just by checking the label. It is not so uncommon to find "vegan-friendly" listed on it, especially with organic wines. There are lots of online databases that list what wines are vegan and what are not, too. Also, if you are visiting the winery itself, if the person giving the tasting is knowledgeable enough, they might be able to tell you! If they don't know, however, don't sass 'em too bad. If they haven't had the question before or if the winemaker hasn't imparted the info, they probably won't have any idea. See if you can talk to the winemaker? It can be a difficult situation to figure out, but press on! And know that you can always just go home and drink copious amounts of Adair wine. 

Come visit the tasting room or see us at farmers markets. Mention this post and I'll pour you a little extra of the peach dessert wine. It got "Best of Show" at last year's Hudson Valley Wine & Grape Association awards! We got a silver cup for the tasting room for that! I had a dream of eating cereal out of it, but never could work up the nerve to do it. 

What I mean to be saying is, Adair wine is the best. I'm not saying all this just because I work there, I'm sharing it because the extent to which I believe in and wouldn't mind exclusively drinking Adair wine is perhaps nerdy. Truly local wine that you can feel great about! 

So, after you have made your fettuccine, break out YOUR bottle of 2004 Frontenac that's been dusting up your wine rack for years, and drink it! If you don't have that bottle for some reason, improvise. Whatever you drink with this food will probably be fantastic. I trust you.


Thursday, October 1, 2009

see, here's the thing.

pumpkins are real. 


it is a little known fact that you can put pumpkin seeds in the ground in early spring and if you take good care of them or at least moderately good care of them you will have one or two or several in the fall. they grow on vines and are orange and fabulous. the one i used and the ones pictured came from my garden! pumpkins are actual things, people.


i stress this because of this. these cans of pumpkin that seem to stand in for real pumpkin all the time. and you know what? most of the time they're not even pumpkin. they're squash. the companies have been pulling a fast one on us for years, and we've just sat by and taken it! well, not anymore. not now. find a real goddamn pumpkin any way you can and let's get to it.


admire the thing for its exquisite beauty. pat yourself on the back for either growing it yourself, snatching it from a neighbor's garden, or selecting it from a plethora of other pumpkins at a local farmstand. then cut the thing open, as in half as you can (mind the stem, or cut the stem out ahead of time, jack-o-lantern style) and scoop out the insides.


 an ice cream scoop works well, but you can also just dig in with your hands because it's fun and gooey and while you're doing it you can really get a good laugh in at yourself. also, if you're me and trying to photograph the venture at the same time, it will make things extra difficult. 


so, scoop out the insides as well as you can. get all the stringy stuff out. 


you can save the seeds and then bake them and spice them and have a grand old time with them if that's what you're into. or, just compost 'em. 


cut the stem out if you haven't already, and then cut the pumpkin caverns into smaller pieces. 


i call them caverns for obvious reasons. something adorable could probably make quite a home out of one of these hollowed out pumpkins. if you have ample pumpkins, hollow one out and set it up outside. not as a trap, but as an experiment. cut little windows and a door out of one side. your neighbors might think you're a creep, but you'll be the one with a somewhat domesticated vole family at the end of it all. if it works, consider making a quaint little village with pumpkin seed pathways. 


fire up your favorite steamer (i assume you have many) and steam up all the pumpkin fractions! 


you can also bake them if that is more your style. to bake them, put them on baking sheets that have a good half-inch to an inch of water in them, to steam them and to avoid anything burning.


after about 20 to 30 minutes of steaming, or 40-50 minutes of baking, your pumpkins should be soft and ready to be pureed. the skin should peel easily off of them. 


if it doesn't, give them more time in the steamer or oven, or just scoop the pumpkin from the shell manually. give it time to cool before you do this, either way. the pumpkin is going to be super hot and if you are too overzealous with handling them, you'll earn yourself some time in the burn ward, which won't be nice to begin with, but will feel extra horrible because you most likely don't have health insurance, even less, BURN insurance and oh golly. so, just let it cool. go take a walk or make a sandwich in the meanwhile.


once it has all cooled and you have all the skins off, puree all the pumpkin! i use an immersion blender, and it is quite the wonder machine. i feel like every kitchen-prone individual has that one kitchen implement that they swear by. it's actually annoying. whenever they use it, they'll say something like, "oh, i don't know what i'd do without my ______," or "what was my life like before i had my _____?" i have found this most often to be the case with people and their salad spinners. since i still don't have one, though, i can't relate. i eat somewhat soggy salad and get by just fine. but the immersion blender?! i don't know what i'd do without it! what was my life like before i had it? oh, i have no idea.


blend the pumpkin up with whatever you have. immersion blender, standard blender, masher, fisticuffs, egg beater...just get it all pureed. then you have pumpkin! ta-da! it is just like what they put in those cans, except that it probably has leeched little to no aluminum into it, and it's ACTUALLY pumpkin! yes, you can be sure of that.


so, once you have the pumpkin puree, you can do whatever you want with it. i recommend breads, pies, soups, ice cream, cookies, the whole nine yards. here i will impart a stellar pumpkin bread recipe, however. also, i will remind you that you can make a whole bunch of pumpkin puree and freeze it and have it year-round.


so, here's what you need for pumpkin bread:


1 cup sugar

1/4 to 1/2 cup maple syrup

1/2 cup applesauce

1/2 cup water

egg replacer for 2 eggs (i use 4 tablespoons water mixed with 4 tablespoons cornstarch)

1 2/3 cup flour (local flour wild hive blah blah blah)

1 teaspoon baking soda

1 teaspoon cinnamon

3/4 teaspoon salt

1/2 teaspoon baking powder

1/2 teaspoon nutmeg


so, a quick note on apples/applesauce. if you live in the hudson valley, or even better, around new paltz or highland, there is a pretty sweet resource for you to get awesome organic apples. you can lease an apple tree from Libertyview Farms, and get full use and harvest of a tree for the season. my house has one, and this means we are constantly eating apples, making applesauce, apple pie, apple crisp, all that stuff. unfortunately, we had just gobbled up the latest batch of applesauce from our apples, and i had to use the jar stuff for this recipe. but, i just had to note. homemade applesauce in this recipe would be killer.


mix the wet ingredients together in one bowl. mix the dry ingredients in another. then mix both together. easy!


pour into a greased loaf pan and bake at 350 degrees for 70 minutes or so. ovens vary, so just check it periodically with a knife or toothpick. and take a tip from me and don't let the top burn. the top of mine burnt due to small neglect. boy is my face red. i considered for a millisecond photoshopping this picture so it appeared to be perfectly un-singed. but here's the deal: my photoshop savvy just isn't what it used to be.


also, you may remember that pumpkins are real. burnt pumpkin bread is as well.


other uses for pumpkin? oh, i'm sure you know. carve your favorite archie character into the side of one. or, at least, the most identifiable archie character. that being archie, himself. that's what i did last year and i can't say it turned many heads. but, you know. someone's got to do it.


photo.php.jpg

Friday, August 7, 2009

pickled hot peppers:
it is easier than you'd think to avoid any and all double entendres using the word "hot."


i'd like to begin this entry by declaring this: friends are important. so important that the sentence "friends are important" is immediately the biggest understatement ever. but, it is the closest to the truth that i can get right now. friends are often how you know the things you know. you can learn so much from them, and they can learn so much from you. i feel incredibly lucky to have so many solid friends. i'm trying not to brag too hard. but, really. they're great. monica and ross do the silliest things sometimes.

this brings me to simon thrasher. if you ever have the privilege of meeting this man, you will truly understand why the sentence "friends are important" is partially some sick joke. i am positive that simon is one of the most incredible people living today (and when he is dust, he will be one of the most incredible people of the past), and it is from him that i learned how to make picked hot peppers.

see? full circle. also, i am openly accepting all claims of simon not being one of the finest humans ever, mostly as a dare. 

to note: this guide is mostly all approximations. later i'll even call myself a hack.

so, i was inspired to do this upon coming home from work, giving the garden the ole once over, and seeing a nice number of hot peppers glistening on their stems, so ready to be picked. it was also an activity i could mostly do entirely while sitting on the porch, which is always preferable. 


harvest your peppers. cradle them in your arms because you do indeed love them very much. bring them to your cutting board and slice off the stems (lovingly), keeping them to use as cute little hats for your friends or for inanimate objects in your house. they are aesthetically quite versatile. 


before i go any further, there is something i need to stress. do not, do not, really do not touch your eyes at all during this whole jam. don't touch any festering wounds, either. wash your hands after you're done with everything. have an adult on hand to help you if any of this is difficult. i mean it. 

so, cut up all your peppers. i like cutting them in rounds, but you can really do whatever you want. 


get your jars together (good buddies ball or mason) and boil them and the lids in water for a while to get them all sanitary. 


jam all your peppers into your jars. really smush the peppers into the jars, make them pretty tightly packed.


add salt to the jar. for each pint jar i used one tablespoon of sea salt. for quart jars i use two tablespoons. 


sprinkle the salt on top and then fill the jar with water, leaving a real small amount of room at the top for air. then, seal them up!


leave them at room temperature for about three days (opening them slowly and slightly every once in a while if you think it might bust without releasing some of the bubbles), and then keep them in the fridge after that. then put them on food. you will probably find yourself planning meals specifically around their usage. when i was introduced to them, i ate so much mexican food just so i could work them in all the time. i highly encourage this practice.

in effort to tie simon back into things, i will share this. the very peppers that i used for this canning grew from plants that were delivered to me by my pal marybeth from simon, from the ithaca farmer's market. they were in trays in their infancy when i received them, and are now popping out peppers like it's nothing. oh, agriculture

i'm going to be honest here and say that i am a total hack when it comes to some things. this tutorial is based on the way i do things, which may or may not be the best/most efficient/most radical way to do it as a whole. i'm kind of casual about measurements and taste and all that stuff, and often my fermented foods will explode out a slight bit upon being opened after a few days of sitting, but i am okay with this. experimentation, people! another great way to learn things.

this way of fermenting things is called lacto-fermentation. it keeps all the good bacteria in your food, versus using vinegar to pickle things and killing off all sorts of friendly bacteria. lacto-fermentation often uses whey, which is not at all vegan, so is nothing i am remotely interested in using or instructing on. you can lacto-ferment things with just salt! you can make pickles with just cucumbers, water, dill, salt, and garlic. sure, coriander and cumin seed would be good, too, but you get the point! lacto-fermentation can be so simple but so incredible! crazy sciency stuff about it can be found here. freaking rad stuff about it from a guy who really knows what he's talking about can be found here. i feel like there is so much to be said and shared on fermenting, and i don't even know a quarter of it. 

i documented a fermentation night at our house that turned out a bunch of dilly beans, pickled beets and sauerkraut. i think that calls for another whole blog post, eventually. maybe i'll have more info together by then.

next on the personal agenda: perfecting the home-made and home-grown hot sauce. when the oil crash hits, i'll still be able to incinerate my tongue at every meal. life is wonderful.


Wednesday, July 29, 2009

Pesto or else:
the tastiest thing to happen to basil. ever. 


it's that time of year. if you've planned things well, you have so much basil right now that you're throwing it in the air and rolling around in a bed of it. it's really fun, but you think you might want to do more with it soon. and here comes the pesto train.

the recipe:
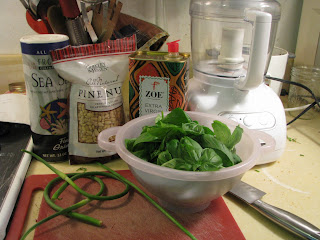
4 cups of basil (fresh fresh fresh!!)
1/2 cup olive oil
1/3 cup of pine nuts
2 cloves garlic (i used two garlic scapes)
salt & pepper to taste


there you have it. all the makings for a super solid pesto! 

first, a note on harvesting basil. to keep your basil plants producing more of the magnificent stuff, you have to pick it at the right place on the plant. also, frequent harvests keep it from flowering, which can make it taste bitter. so, make sure it has at least three sets of leaves, and ideally, is at least one foot tall. pick off the basil that is sprouting up between another two leaves, so that it will continue to grow from there, ensuring a plentiful basil harvest. i tried to photograph this process but did a really awful job. so! here's a helpful website! and here's a car dealership website owned by someone with the last name of basil!
oh, the wonderful world of basil.

remove all the basil from the stems (leaving a little is okay, it doesn't have to be SO precise) and measure it. it doesn't have to be 4 well packed cups of basil, but it should take up 4 cups worth without being too loosely packed.

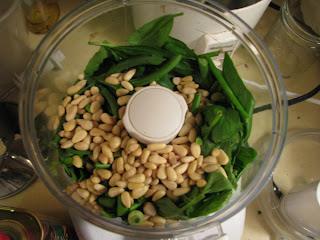
put it in a food processor with the pine nuts and garlic. you can experiment with other kinds of nuts, too. i've heard of walnuts working well, i just have a strong personal affinity for pine nuts. it's in the early stages, though. no worries.

begin to mix it, and pour in the oil as you go. add salt and pepper as needed, and also add more pine nuts or basil or whatever you think it needs.

this recipe makes one cup of really rad pesto.

this brimming ball jar of pesto was too exciting for my camera to even focus on. wild, i know.

now that you have pesto, you should do these things with it:
-mix it and only it with pasta.
-have a hummus/pesto/cucumber/tomato/avocado sandwich.
-make sushi and put a layer of pesto on top of the layer of rice.
-put it all over veggie burgers.
-use it instead of tomato sauce (or in conjunction with) on pizza.
-attempt to use the leftover basil as currency at any local shops.
-throw a pesto party in which everyone wears green and brings their own starchy something-or-rather to cover in pesto. optional: pesto pinata?